
Concrete Countertops:
Getting Started
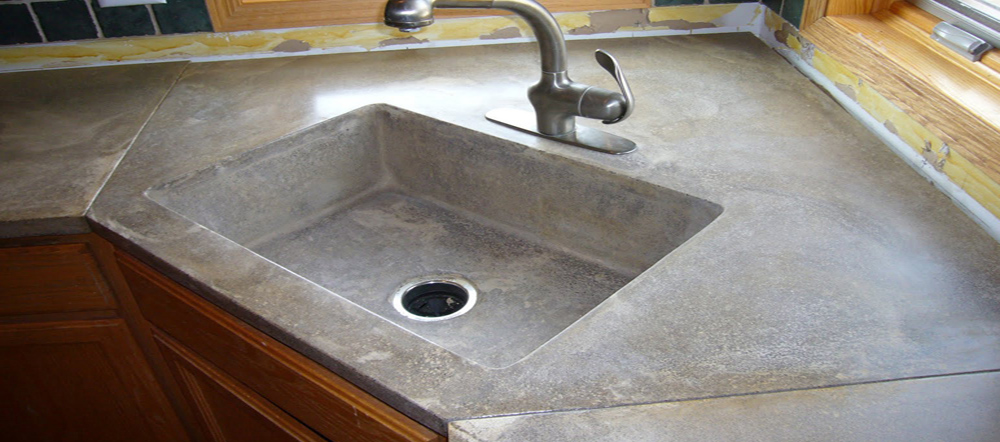
CONCRETE COUNTERTOPS are becoming more popular, and understandably so.
The ingredients are relatively inexpensive, the installation is relatively easy with a step-by-step guide, and the project is green.
Ah, but can you really do it yourself? I have, so here's a rundown on the process that reflects both the book's advice and my experience.
For a 4-foot-by-22-inch countertop that is 1 ½ to 2 inches deep, you'll need to spend about $25, and you can reuse the form you'll have to build.
Need to know: There are two ways to make a countertop. One is to build the form and then pour the concrete in place where you want it. The other is to pour concrete into the form upside down and then turn it over, which gives you a more rustic-looking counter. Pouring in place is easier for a do-it-yourselfer.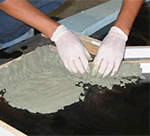
Material world: You'll need two 80-pound bags of dry concrete (you can use nonshrink grout), a drill with a concrete-mixing attachment (about $4), concrete cleaner, a steel trowel, a wood float, two plastic buckets (5-gallon and 1-gallon) for mixing and to hold water, caulk and a caulk gun, deck screws, cooking oil, a 2-inch paintbrush, a rubber mallet, a length of 2-by-4 for a screed, and sandpaper. Also required at the end: coloring agent and something to help cure and seal the finished countertop.
Form, then function: The form is made of laminate wood strips, with the bottom made of melamine or laminate to keep the concrete from adhering to it. That's the reason for the cooking oil: Spreading a little on the inside does the same thing as greasing a pan when you bake. Lay a bead of caulk on the inside edges of the form to stop leaks.
How to Do It
Mix it up: Blend the dry concrete with water — 80 pounds gives you about 2 ½ linear feet of countertop — making sure what you come up with is stiff, not soupy. An oatmeal-like consistency will prevent water from puddling to the surface, and the concrete will be uniformly stronger. The dryer, the better.
Color-conscious: Add coloring agent to the mixing water, for better control and consistency from one batch of concrete to another. Check instructions on the products you use; the typical ratio is two bottles of color to 80 pounds of dry concrete. Once the concrete reaches that oatmeal consistency and the color is uniform throughout, pour it into the form.
Operating manual: Overfill the form with your mixture, then take the 2-by-4 to screed it at an angle from one edge of the form to the other, back and forth in a sawing action. This levels the concrete in the form and pushes larger aggregate down. With the rubber mallet, tap the sides of the form to reduce air pockets that could leave a void in the surface. Smooth the surface with the wood float, which helps make the surface harder and more durable. When the surface is "thumbprint hard," finish it by pressing down with the steel trowel.
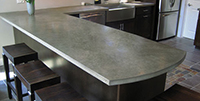
Patience please: Wait at least two days before removing the countertop from the form, then take the screws out and pull the pieces of the form away carefully. Use the fine-grade sandpaper to carefully remove imperfections that have formed on the surface. Clean with a concrete cleaner, then apply one coat of acrylic sealer with the 2-inch brush and allow it to dry. Then mix the sealer with one part water and apply a second coat. Seal the surface regularly.
Learn more about concrete countertops from the master, Fu Tung-Chen, at his website, Concrete Exchange.